Cinnamon Swirl Bread Recipe

I’ve always wanted to try making a cinnamon bread, and here it is! I must say, it turned out rather well. It’s not too sweet and easy to make. You could easily use honey in place of the first sugar. And use whatever flour you’d like. I actually baked mine on a cookie sheet, but I would recommend putting it in a loaf pan so it doesn’t flatten out so much. I tend to “wing it” with recipes, but a number of folks wanted the recipe, so here it is:

CinnamonSwirlBread

Cinnamon Swirl Bread — Yields one loaf

2 c organic spelt flour
1/2-1 c organic unbleached white flour
1T yeast
1/2 c organic milk
1/3-1/2 c water
1/8 c brown sugar
2T organic butter (plus 1T)
1T salt

1 farm fresh egg, beaten
1T cinnamon
1/2 c brown sugar

Stir together 1 cup of spelt flour and yeast.

Heat milk, water, and 1/8 cup brown sugar, 2 tablespoons butter and salt (though I forgot the salt and it didn’t seem to matter) over low heat until butter is melted.

Slowly add heated mixture to flour yeast mixture and mix well. Blend in the egg. Add the white flour (though you really can add whatever flour you’d like), a little at a time, until the dough chases the spoon around the bowl. Then, turn out dough on lightly floured surface and knead for at least five minutes, adding flour as needed. Form dough into ball and place in a greased bowl, cover with plastic wrap or tea towel, and let sit in a warm place for about 45 min to rise.

In a small bowl, mix together 1/2 cup brown sugar and cinnamon. Melt 1 tablespoon butter. Grease loaf pan well.

After dough rises, knead dough and roll out to about 1/2 inch thick rectangle. Brush with melted butter, then sprinkle the cinnamon sugar mixture on top. Beginning at the short end, roll the dough up very tightly to form a roll. Flatten ends a bit and roll them under the bottom. Place roll in greased loaf pan. (Try not to have too much cinnamon mixture exposed or it can ooze out the bottom while baking.)

Allow bread to rise for about 10-15 min. Preheat oven to 375 degrees F. Bake for 35 min. Remove from pan and allow to cool on wire rack. Enjoy!

Egg Storage

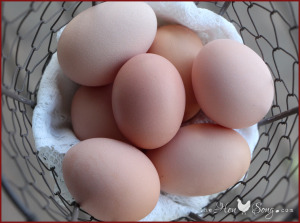
In posting a photo of my new egg skelter on my Facebook page, I was surprised at how many folks asked me, “You don’t keep your eggs in the refrigerator?” No, I don’t. My eggs are not washed and therefore do not need to be kept in the fridge.

skelter

Now you might get differing opinions from others, and to each his own. But these are my thoughts…

Mother Nature has thought of everything in creating the farm fresh egg. Not only is the egg a beauty to behold, but also very practical. The last stage in creating an egg—just before it is laid—involves adding the “bloom”, which is a protective coating over the outer shell. This wet coating quickly dries as soon as the hen lays the egg. It protects the contents from harmful bacteria getting inside. Think about if the egg was fertile and mama was sitting on a clutch of them for 21 days. Mother Nature has provided a safe place for the developing baby inside that cute egg.

In Europe, you won’t find eggs in the refrigerated section of the market. They have not been washed. When you get an unwashed egg, you know what kind of condition the nesting boxes are in. Occasionally, even the cleanest of boxes will get a muddy foot in there which can dirty the egg a bit. But, for the most part, farm fresh eggs are clean because the hens live in clean conditions. Do you think all the eggs in U.S. supermarkets come from clean conditions? If they did, they wouldn’t need to administer so many antibiotics. But, we’ll save that for another blog entry…

So, enjoy those unwashed, healthy eggs! And if you’re looking for a nice way to display them, I can recommend an egg skelter. Just love mine!


Some more little egg-bits:

eggsInBasketDid you know the egg travels pointy end first, and at the last minute (just before being laid) turns 180 degrees so the fat end comes out first? Also, hens will sit in the box as the egg gets ready to be laid. Just before she’s ready to lay the hen will stand up a bit, and viola, out comes an egg—fat end down—in the nesting box!

Do you know how to tell how old an egg is? Do the water test: Put an egg in a glass of cold water. Does it float? Or sink? If it sinks all the way down and lays flat, it’s very fresh. The more it floats the older it is. Here’s why: Eggshells are porous, and over time air will seep in at the fat part of the egg. That air is what the baby chick—if the egg was fertile and had a developing baby in it—would first breathe. Ever notice when you hard boil an egg and the fat end has a dent in it? Yup, it’s an air pocket. The bigger the pocket, the older the egg.

Pretty neat-o, eh? I think so. But then I could talk “chicken” all day long!

Braided Rosemary Bread Recipe

I’ve been wanting to make a rosemary bread for some time. And, I’ve wanted to use egg in a bread recipe for some time. This turned out to be the perfect combination. This bread tastes great with just butter on it, or as a side to over easy eggs, or for dipping in homemade red sauce on pasta. Mmmm!

breadBraided

I’ll admit I’m not one for following recipes exactly. That is, I like to “wing it” more often than not. I modified this from the rosemary breadsticks recipe in this month’s Mary Janes Farm magazine. I used organic ingredients whenever possible and I used local (Hatcher’s Pass) honey.

Here is the reicipe I used:

1 c warm water
3 T melted butter
1/2-1 t honey
1 T active dry yeast
2-3 c white flour
1-2 sprigs fresh rosemary
sprinkling of salt
1 farm fresh egg
sprinkling of course salt

In a small bowl, whisk together the water, butter, honey and yeast. Let it sit. In a larger bowl, mix together 2 c flour, rosemary and salt. Add the yeast mixture to the flour mixture, and mix well. Add more flour until the dough chases the spoon around the bowl.

Turn out on a floured surface and knead, adding flour as needed (I used whole wheat flour here). Form dough into ball and place in a lightly buttered bowl. Turn ball of dough over (so butter is on top of dough). Cover with plastic and set in a warm place for 45 min to let dough rise.

Preheat oven to 400ºF. Turn dough out on floured surface, knead, then separate into six balls of dough. Roll each ball into a long piece of rope. Take three “ropes” and attach at one end, then braid, and pinch end under. Do same with remaining three ropes.

Whisk egg. Lightly brush egg on each braid and sprinkle course salt on top. Place on greased cookie sheet and bake for 20 min. (Remember they will rise, so give each loaf enough room.)

Cool on rack, and try not to eat it all before it cools. Good luck!

Next time, I’m going to add more rosemary, and maybe some sage and thyme. Braiding in a circle would be fun. Oh, the possibilities are endless!